


|
|
|
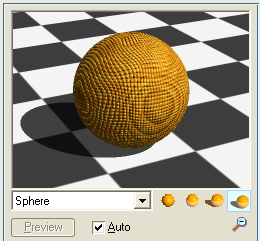
| Each of the three main dialogs for material, background and light settings contains a large preview window that provides various rendering qualities, two different resolutions and an automatic or manual update, respectively. These options are the same for all dialogs.
|
| In addition to these basic options each preview window provides a selector box right beneath the window that offers various selections of views and object groups for the preview rendering, arranged in regard to the specific demands for the individual dialog.
|
|
|
| Resolution - Click on the magnifying glass to change between the two possible preview picture resolutions (240 * 180 or 160 * 120 pixels).
|
|
|
| Quality
|
| 1. Simple Scanline algorithm.
|
| 2. Raytracing, without shadows and antialiasing.
|
| 3. Raytracing with shadows.
|
| 4. Raytracing with shadows and antialiasing.
|
|
|
| Auto - If this button is activated then each change in every parameter will cause an immediate redraw of the scene in the preview window. If the <Auto> button is switched off you have to start a redraw manually by operating the <Preview> button. This is advisable when working on very complex scenes and you want to adjust several parameters in a row before starting a new preview calculation.
|
|
|
| Stop Preview Calculation (ESC)
|
| If a preview calculation of a very complex scene lasts to long you can interrupt the preview any time by pressing the <ESC> key on your keyboard. Of course complex scenes, for instance a landscape scene consisting out of millions of points and facets, ought to be rendered in a low grade rendering mode, preferable in raytracing mode without shadows and antialiasing.
|